Cradle of the Death God Strategy Guide: Elevator Phases
The “Cradle of the Death God” is the group content addition of Neverwinter’s Lost City of Omu update. As trial, the main part of the fight is against a single boss encounter, but there are a couple more phases before that. In this guide we walk you through all necessary hints and information to beat Acererak and his Atropal.
[su_box title=”More on Lost City of Omu!” radius=”0″]Want all the latest on the new Lost City of Omu update? Click here for the full coverage![/su_box]
Phase I: Elevator Skull Punting
The story and fight directly starts where players left off in Module 12. On entering the trial, groups find themselves on the Ras Nsi boss platform in the Tomb of the Nine Gods. Starting the fight will send them further down the Tomb in an elevator.
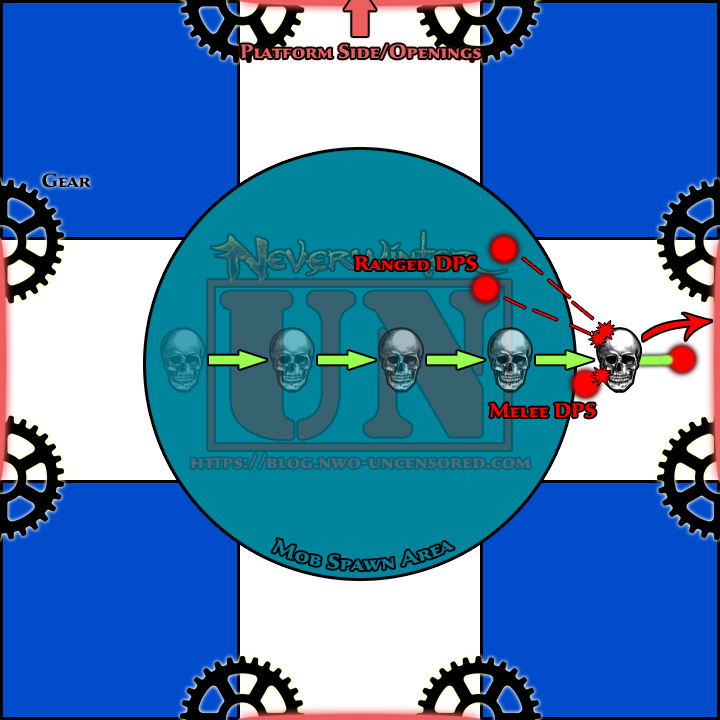
After defeating two initial waves of mobs, the first real phase starts. At a random side of the elevator an Acererak projection appears and a skull occasionally gets attached to, and slowly moves towards, a random player. Players with the skull have to position themselves at the platform ledge right in front of the projection. DPS then have to kill the skull from the opposite side to kind of “punt” it towards the projection. The final hit determines the punt direction.
The overall approach is relatively simple. The players that have the skull attached to them just have to move to the side of the projection, the DPS wait until the skull is in position, and then kill it. After three successful hits the phase is done.
Unfortunately there’s other stuff going on. In the “Mob Spawn Area” the group has to deal with some mobs and survive AoE attacks with undodgeable damage and CC. While the AoE is merely annoying, you actually have to watch out that your attacks do not kill the skull too early. It certainly helps to have strong healers and tanks around that can kite and outheal the mobs so the DPS can concentrate on the skull. Additionally players get occasionally grabbed by a hand known from Valindra and Tomb fights and have to be freed.
Usually well organized groups have no issue dealing with this phase. In case you have really trigger happy DPS around, it might help to move the full group to on of the four corners. Whoever gets the skull then moves with one or two DPS in position and handles the mechanic, while the rest of the group fights or kite the mobs away from the punting action.
Phase II: Jelly Gear Glueing
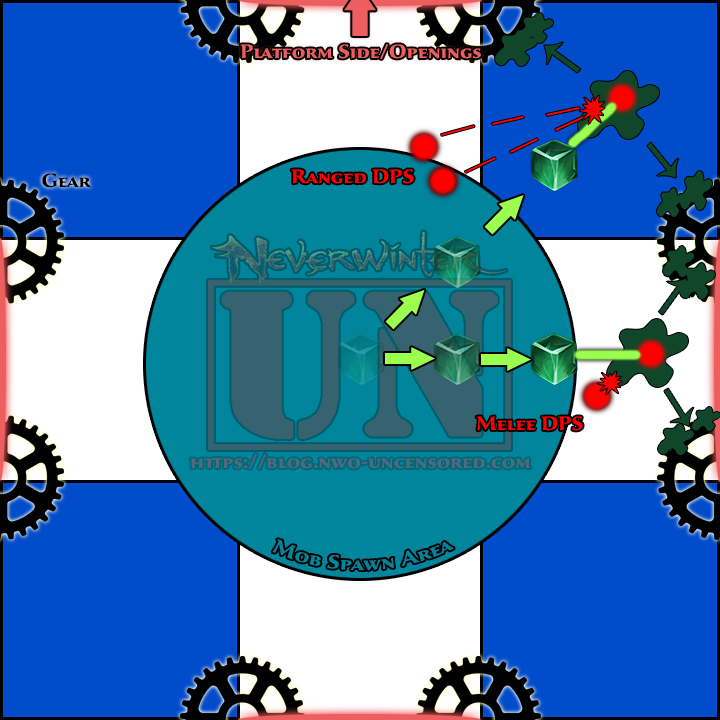
After phase I, the group has to defeat additional waves of mobs before Acererak sends the elevator into a free fall. This phase is actually pretty similar to the skull punting one. This time however players do not get attached to a skull, but a Gelatinous Cube. The cubes have to be used to glue the eight gears, and stop the fall. One Cube in the right position is able to hit two gears, meaning that you ideally only need four to succeed. The phase is timed, and if you’re not fast enough, the trial will fail.
The issues and approach matches the one of phase I. If you have the Cube, move into position, wait until the Cube is there, and then kill with the group. In a potent team the cubes do not deal too much damage, so it should be possible to just stay in position. Some players tend to overreact and dodge all over the place when they have the Cube. This only leads to it being killed out of position. The cubes also die even faster than the skulls, and spawn with other mobs. DPS really have to be careful not to kill them too early. Last but not least, communicate whether you pull cubes to the corners or the platform openings. As shown in the picture you can hit two gears at once in both positions, but have to be on the same page to not waste any cubes.
If you have trouble pulling this phase off, once again moving to a corner makes tons of sense. This has multiple benefits. First of all, it prevents that your DPS just accidentally kill cubes in the “Mob Spawn Area”. Second, the player that stands closest to the middle of the platform always gets the Cube. While the group stands in the corner, someone can be the designated Cube puller, pick it up in the middle, and bring it in position. What you can also do is always move as full group to the next glue position. Start bottom left or wherever, wait until the first Cube spawns and is in position, kill it, and then continue clockwise.
Conclusion
The first two phases in the elevator are all about smart DPS. If you fail here, it’s because some button masher didn’t pay attention. Remember that these phases are not about gunning down mobs, but bringing the skull and cubes into position. So trust your tanks and healers, and don’t overkill. Not solely going for the paingiver is also important since someone has to kill the skull and cubes once in position. I’ve often seen DPS that mindlessly slay mobs in the middle while some buffers try to deal with the actual mechanics. In case you have a new or somewhat stupid group, try to assign roles before the fight. This usually shouldn’t be necessary if everyone knows the mechanics, but can’t hurt.
This is our elevator guide for the Cradle of the Death Gods trial. In part two of this guide we deal with the Atropal, so click through! Also make sure to share your elevator experience on our social channels, in the comments below, or the corresponding thread on our message board!
Neverwinter UN:Blogged is always looking for writers to contribute to the blog. If you are an active player and search for a way to spread your opinions, analysis, diaries or reviews to more than 40,000 regular visitors, then don’t hesitate and get in touch with us on our contact page or message board! We are currently especially looking for console and PVP content, but that’s not exclusive. There is no frequency requirement, you post how often you want.


When did they start calling them “Trials”? And do we have “Raids” at all?
We have Dungeons, Lairs and Skirmishes, and we have Dungeons treated as Skirmishes, and Skirmishes treated as “Epic” Dungeons, when the main difference between a Dungeon and a Skirmish is that a Skirmish should be above-ground, like Master of the Hunt and Shores of Tuern, whereas a dungeon should have an internal, underground dungeon section, like Malabog’s Castle, Valindra’s Tower and Kessel’s Retreat.
You can tell the difference, as a Dungeon always has a section where you cannot ride your mount, as it is indoors. In a Skirmish, you can ride your mount all over.
Lairs are just mini-dungeons, designed to be soloed; although some are actually open to the air as we can ride mounts (like The Witch Fen in Sharandar.
But what are Trials and Raids? How are they defined?
Is a Trial a 10-man Skirmish, like Demogorgon, and a Raid a 25-Man Skirmish, like Tiamat?
Ooh, I feel dim…
>:8o
Everything 10/25 group size is a trial. A raid would probably be a dungeon > 5, but as we know NW doesn’t have those.
Ah, OK. Cheers!
Really wish the Devs would install a stairwell so we could get past the elevator phase that or add some beds . just soooooooo boring.
Hey, nice guide! Someone share it in a forum and it help me a lot, so thanks for that!