A Guide To The Demo Tool Vol. 5: Smarter Rendering and Advanced Options!
Not everybody who plays this game knows, but Neverwinter actually has a replay feature! It allows for capturing high quality screenshots or replaying the action of an entire dungeon boss fight. So how does it work?
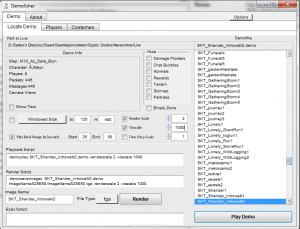
Selective Rendering with the “Demolisher”
I introduced this open source software in part 4. There I wrote about how it is pretty much only useful for taking screenshots and not videos. This is because you can’t save a camera path into a demo that you opened via the “Demolisher”.
Turns out I was wrong. It CAN be used for videos.

The “Demolisher” has a function called “Play Back Range”. This way you can tell the program to render only a certain part of a demo. Let’s say the action you want to record is 25 seconds into a demo. That means if you render in single frames (how I taught you in part 3) that you will have a lot of wasted disk space and the recording takes some time.
You can tell the demo from which point (in seconds) it should start rendering by entering the values you want into the “Start” and “End” fields right to “Playb Back Range In Seconds”. Then tick its box and press render. That should do the trick.
“Glueing” camera paths together
Sometimes one demo is not enough to capture all the action you want to show. Or maybe there was a long time in your demo where nothing interesting happened. You could just insert a transition into your video with an editing software. But what if I told you there is a way to make it look like it is one demo and one camera path? What? No way!
It is actually quite simple. All you need to do is program 2 different camera paths (into the same demo or into different demos) that share one point with the same world coordinates and directional movement. Record both camera paths and load them into your editing software.
Then you cut away the part after the shared point of the first demo and the part before the shared point of the second demo. Piece the remaining parts together and it will look like it is one demo.
One demo to rule them all. Oh, and maybe you should choose a point where your camera looks into a wall or where there is at least not much to see because clouds or certain other world animations might not look the same for your second camera path. Yeah.

Developer functions
I can’t think of a good reason why but Cryptic gave us full access to certain functions in the demo tool that drastically change how Neverwinter looks and behaves.
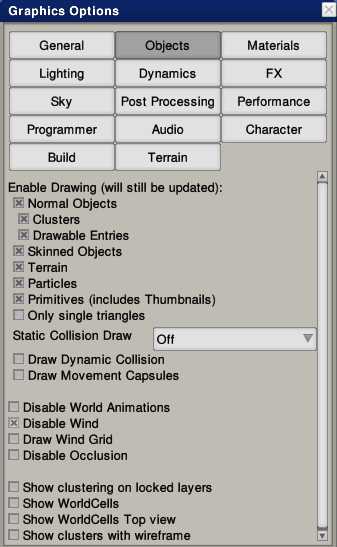
We already learned to appreciate the F5 menu last time because it can disable the fog but there is a lot more useful things it can do for creating videos.
- “Disable Wind”: In the “Objects” tab. This option deactivates all world animations based on wind like trees or bushes moving in the wind. Pretty useful if you want to put two camera paths together but certain environmental objects change from one camera path to the other so it looks “jumpy”.
- “Unlit”: In the “Lighting” tab. Some of you may already know this because there is a command for it that even works in game (“/unlit 1”). This disables all lighting.
- “Force Base Pose”: In the “Dynamics” tab. This forces all entities like NPCs, players or mounts to use the base pose instead of any animations. It looks goofy as hell but could be useful if you want to showcase a certain costume setup or mount.
- “Use HDR 2”: In the “Lighting” tab. This option uses a new HDR prototype that either got abandoned by Cryptic or is still in development. It completely changes the lighting and mood of a scene and can sometimes do wonders in enclosed areas if combined with “Disable Fog”.
- Draw Objects: In the “Objects” tab. Right at the top this tab you can shoose the objects being drawn on screen. “Skinned” includes players, NPCs and other entities (but does not remove cloaks for some reason). “Normal Objects” includes almost everything that is not “Terrain” or listed under “Skinned”.
- “No exposure”: In the “Post Processing” tab. This option disables exposure and artificially brightens up the game. Might be useful if you think your project is too dark or want to darken it in post production.

Ok turns out I lied about part 4 being the last part. But at that point there was no 5th part planned. I swear! So it was technically not a lie, right? Anyway I learned a couple more things about the demo tool that I want to teach you guys, so I hereby announce the 6th installation of this guide.
I also wanted to say thank you to all the people who picked up the demo tool because of my guide and started creating awesome Neverwinter content. You guys are the best!
“Ok that was it. You can turn this thing off now.” …
“What? Are you saying this is not an interview? No microphone? I am just typing this? And I am speaking to myself laughing about that stupid 4th wall joke I just made?”
“Ok I better leave now. Bye.”
Jay.
